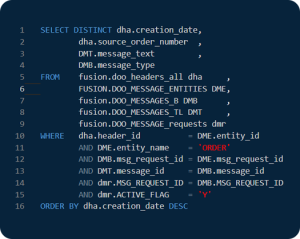
--Goods Receipt Quantity
SELECT Distinct
       pha.segment1                                                                              as "PO Number"
     , ps.Vendor_ID                                                                              as "Vendor Number"
     , ps.attribute1                                                                             as "Vendor Class"
     , ps.attribute2                                                                             as "Managing Office"
     , ps.ATTRIBUTE_NUMBER1                                                                      as "Supplier Legacy"
     , ps.vendor_name                                                                            as "Vendor Name"
     , rsl.VENDOR_ITEM_NUM                                                                       as "Vendor Item Num"
     , rsl.ITEM_DESCRIPTION                                                                      as "Item Description"
     , rsl.QUANTITY_SHIPPED                                                                      as "Quantity Shipped"
     , rsl.QUANTITY_RECEIVED                                                                     as "Quantity Received"
     , to_char( rct.TRANSACTION_DATE, 'DD/MM/YYYY')                                              as "Transaction Date"
     , pla.UNIT_PRICE* pla.QUANTITY                                                              as "Line Value"
     , HOU.Name                                                                                  as "Organization Name"
     , pla.UNIT_PRICE                                                                            as "Unit Price"
     , To_Char( pha.creation_date,'DD/MM/YYYY')                                                  as "PO Creation Date"
     , gl_flexfields_pkg.get_concat_description (chart_of_accounts_id, PDA.code_combination_id ) as "Code Combination Description"
     , gcc.segment1
              ||'.'
              ||gcc.segment2
              ||'.'
              ||gcc.segment3
              ||'.'
              || gcc.segment4
              ||'.'
              ||gcc.segment5
              ||'.'
              ||gcc.segment6
              ||'.'
              ||gcc.segment7
              ||'.'
              ||gcc.segment8
              ||'.'
              ||gcc.segment9
              ||'.'
              ||gcc.segment10 																	as "Concatenated Segments"
     , RSH.RECEIPT_NUM        																	as "Receipt Number"
     , pla.QUANTITY           																	as "PO Line Ordered Quantity"
     , CASE
              When pha.segment1 LIKE '4%'
                     THEN 'Franchise'
                     ELSE 'Company owned'
       End                                     													as "Business ID"
     , Null                                    													as "DS PO Indicator"
     , TO_CHAR( rct.Transaction_Date, 'MON' )  													as "Fiscal Period"
     , TO_CHAR( rct.Transaction_Date, 'YYYY' ) 													as "Fiscal Year"
     , TO_CHAR( sysdate, 'MON' )               													as "Regular Period"
     , TO_CHAR( sysdate, 'YYYY' )              													as "Regular Year"
     , Null                                    													as "PO_USER_FLD_1"
     , Null                                    													as "PO_USER_FLD_6"
     , rct.COMMENTS                            													as "Receipt Description"
FROM
       RCV_SHIPMENT_HEADERS 		RSH
     , RCV_SHIPMENT_LINES   		RSL
     , PO_HEADERS_ALL       		PHA
     , PER_PERSON_NAMES_F_V 		PersonName
     , PO_LINES_ALL         		pla
     , PO_DISTRIBUTIONS_ALL 		pda
     , PO_LINE_TYPES_B				PLTB
     , POZ_SUPPLIERS_V             	ps
     , POZ_SUPPLIER_SITES_V        	pss
     , RCV_TRANSACTIONS            	rct
     , HR_ALL_ORGANIZATION_UNITS_X 	HOU
     , GL_CODE_COMBINATIONS        	GCC
WHERE
       RSH.SHIPMENT_HEADER_ID			=RSL.SHIPMENT_HEADER_ID
       AND RSL.po_header_id				=PHA.po_header_id
       AND HOU.ORGANIZATION_ID			=rct.ORGANIZATION_ID
       AND GCC.CODE_COMBINATION_ID		=PDA.CODE_COMBINATION_ID
       AND PersonName.PERSON_ID			=PhA.agent_id
       AND pla.po_header_id				=PHA.po_header_id
       AND PDA.PO_DISTRIBUTION_ID		=rct.PO_DISTRIBUTION_ID
       AND PLTB.line_type_id			=pla.LINE_TYPE_ID
       AND pla.PO_LINE_ID				=rsl.PO_LINE_ID
       AND pha.VENDOR_ID				=ps.vendor_id
       AND pss.VENDOR_ID				=ps.vendor_id
       AND rct.SHIPMENT_HEADER_ID		=RSH.SHIPMENT_HEADER_ID
       AND rsl.SHIPMENT_LINE_ID			=rct.SHIPMENT_LINE_ID
       AND trunc( rct.TRANSACTION_DATE) between :Receipt_Date_From and :Receipt_Date_To
       AND ps.ATTRIBUTE_NUMBER1			=:Sup_Leg_No