• SSO Connections/ or Without administrative Privileges
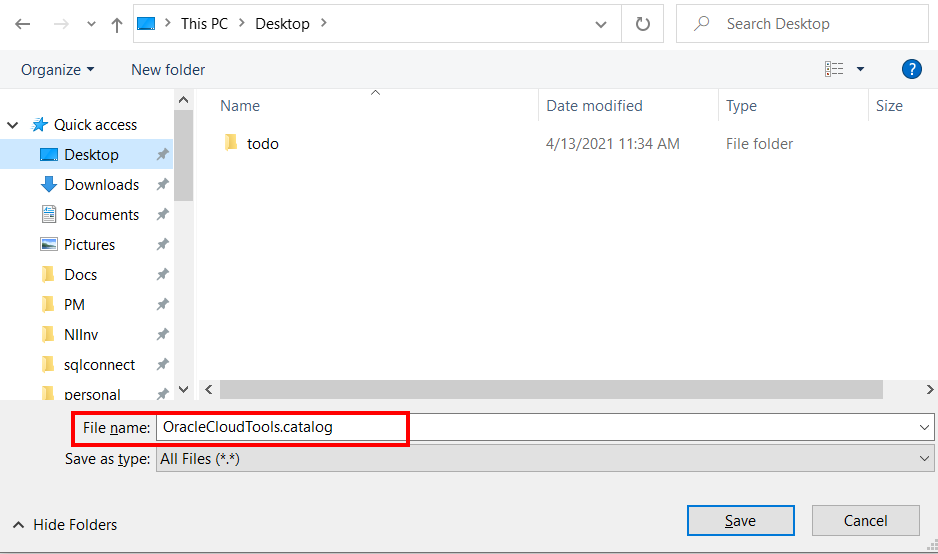
  • Download the latest catalog file
  • Login to Oracle POD as BI Publisher Administrator
  • Unarchive the Catalog file downloaded earlier
  • Set Permissions
  • Check if you have administrative privileges in BI Publisher

How To Setup BI Publisher
Objects In Oracle Cloud POD

1. Local Connections With Administrator Privileges

1. Local Connections With Administrator Privileges

When you are using a local connection and have the admin privileges, SQLConnect will automatically upload BI Publisher Objects for you. You will get following message. You can check if you have administrative privileges or not using instructions listed in Step 5

Please go through Step 4 to setup the permissions

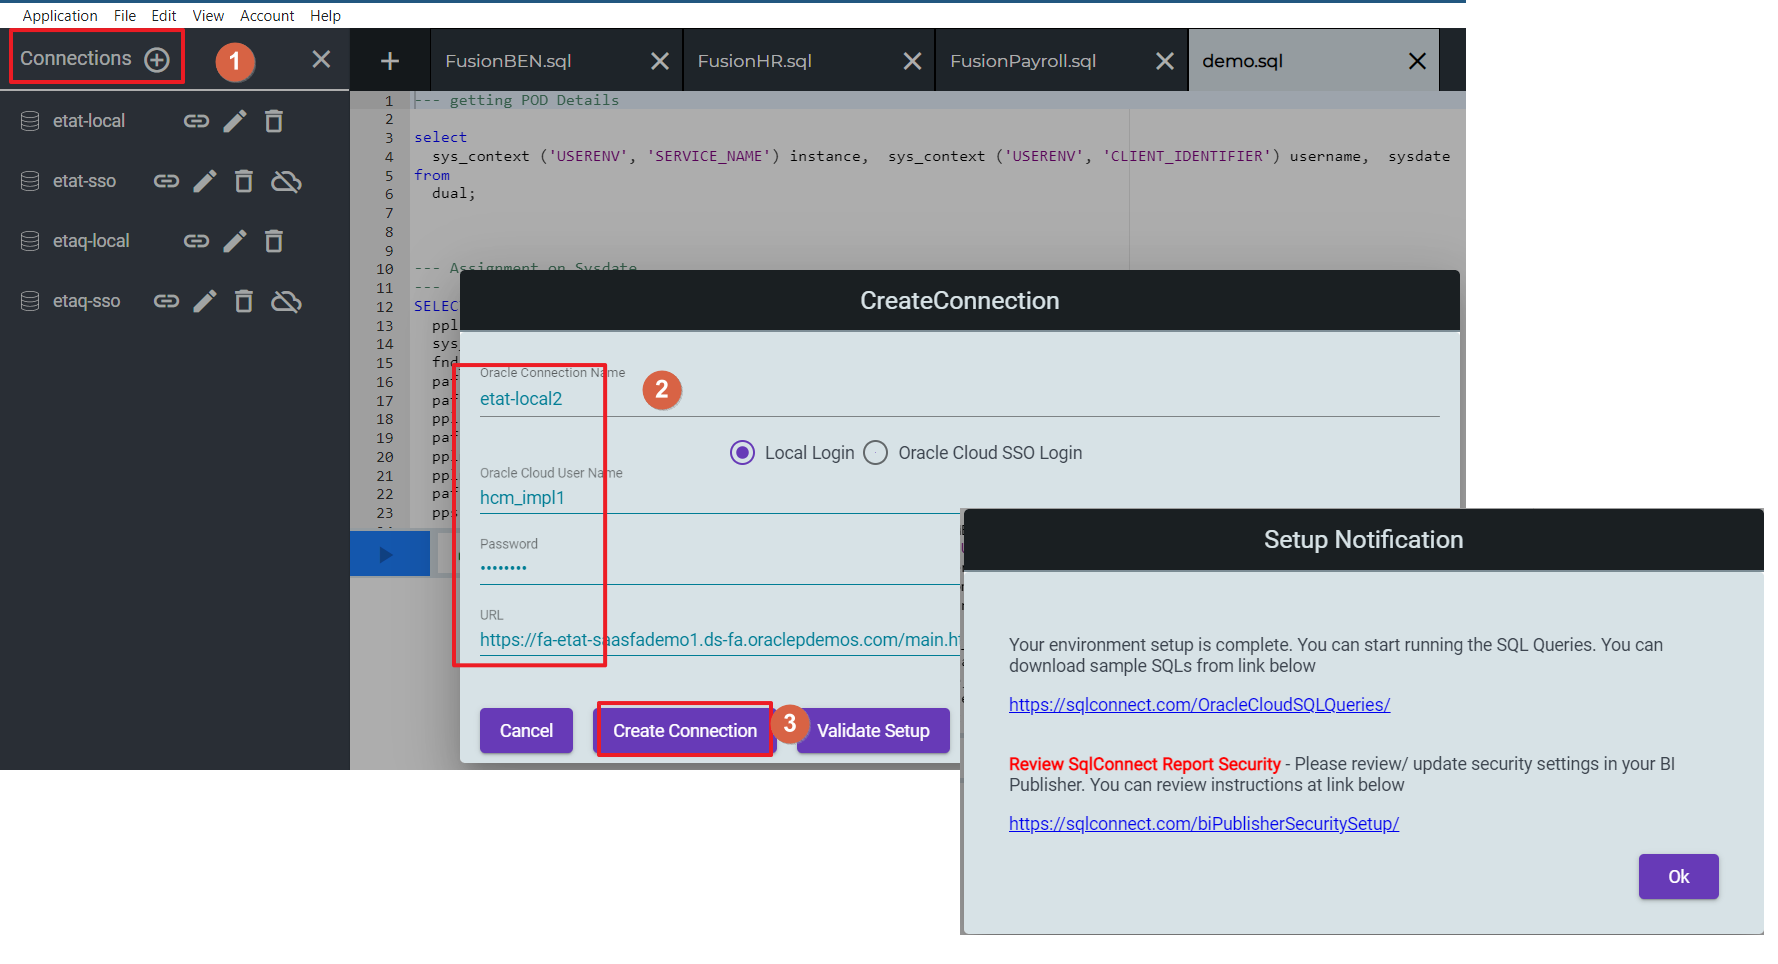
2. Update Existing Connections With Administrative Privileges

In case of P2T you may have to setup the connections information again, you can upgrade the existing connections. If you are using Local Oracle cloud login and have administrative privileges, then you can follow the steps as in screenshot below.

Please go through Step 4 to setup the permissions.

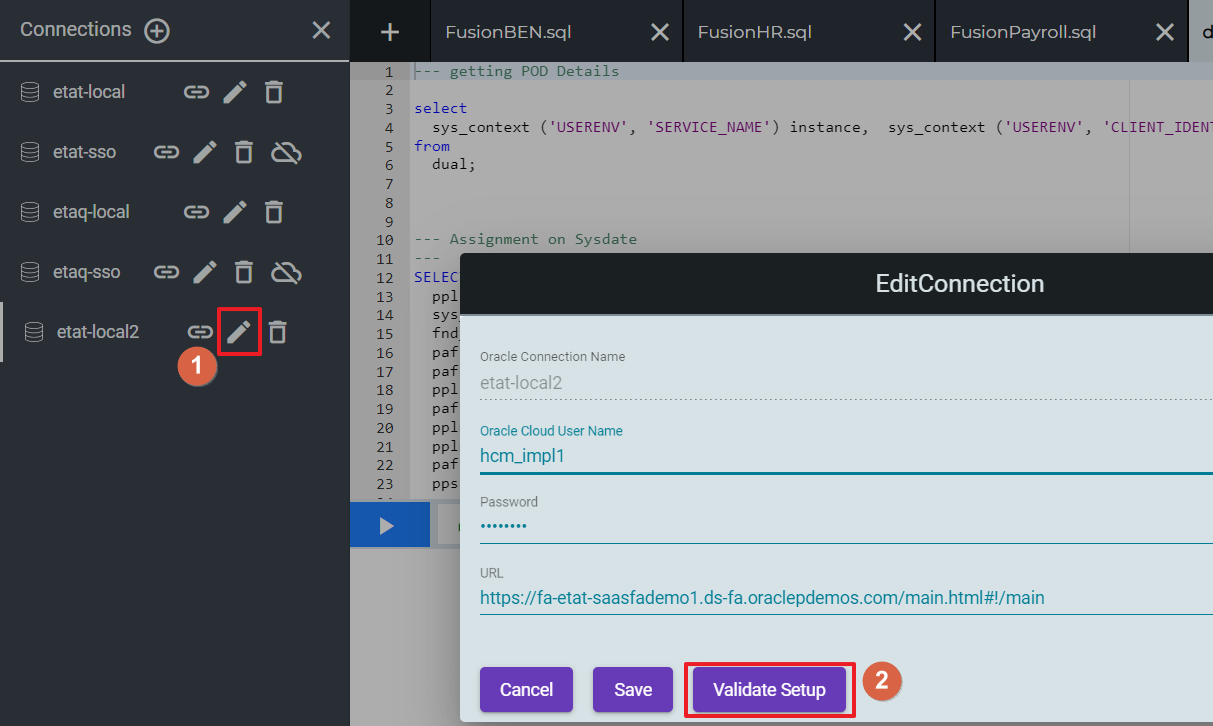
If you do not have administrative privileges or connecting via SSO, you can follow steps listed in Step 3 to upgrade connections as well.

3. SSO Connections/ Or Without Administrative Privileges

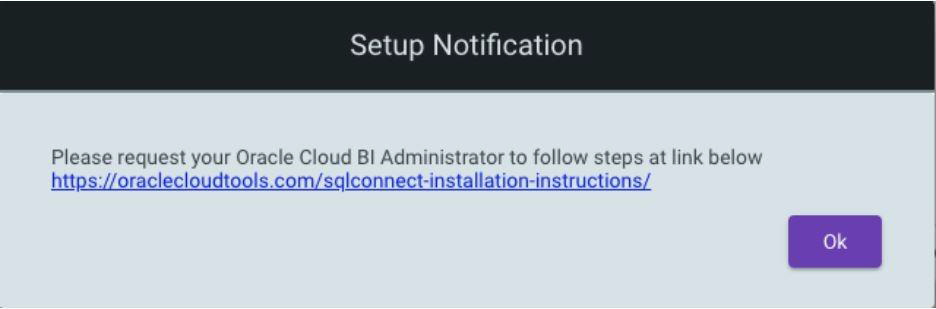
At the time of setting up SQLConnect, if you do not have admin Privileges or if you are logging in as SSO, you will get following message.

You can follow the steps below to setup

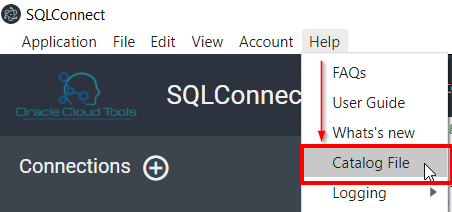
3.1 Download The Latest Catalog File

You can follow the steps below to setup

3.2 Login To Oracle POD As BI Publisher Administrator

Once the file is up, login to your Oracle Cloud POD as an administrator

Example URL: https://xxxx-dev1.oracledcloud.com/analytics/saw.dll?catalog

You will see on the right if you have admin rights or not

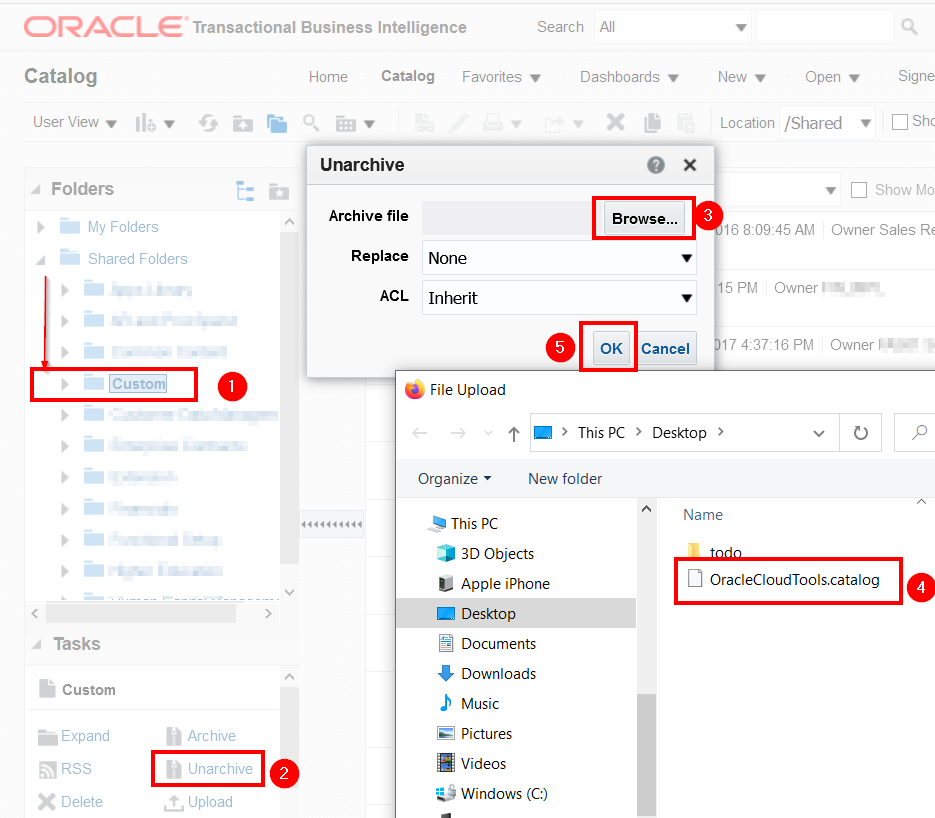
3.3 Unarchive The Catalog File Downloaded Earlier

Click on Custom Folder, Unarchive the file you have downloaded.

After uploading the files, Please go through Step 4 to setup the permissions.

4. Set Permissions

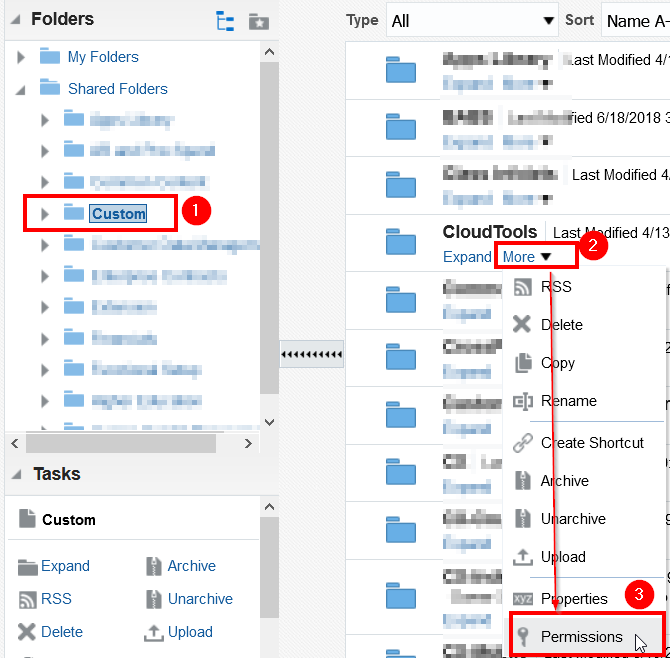
Once the object is uploaded, Cloud Tools folder should appear in Custom Folder.

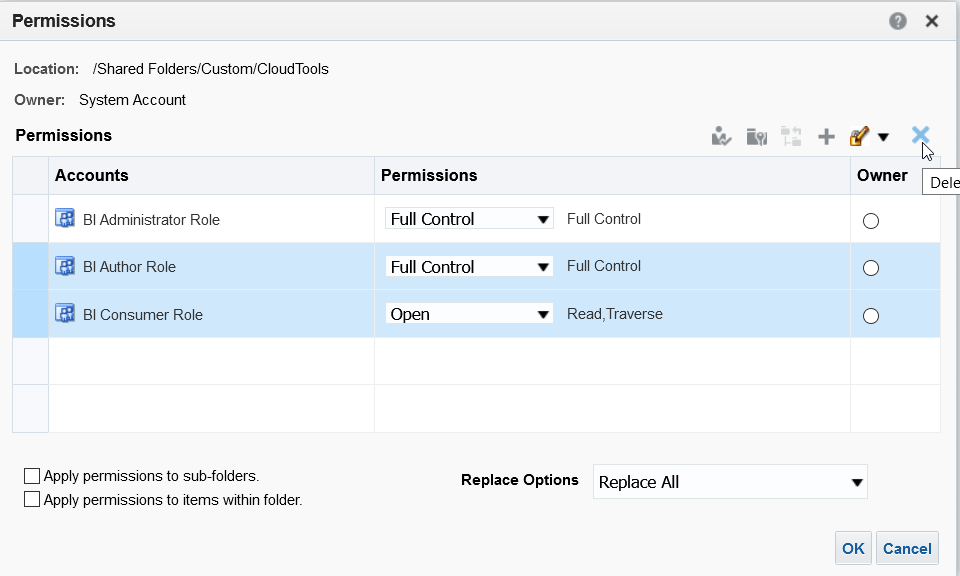
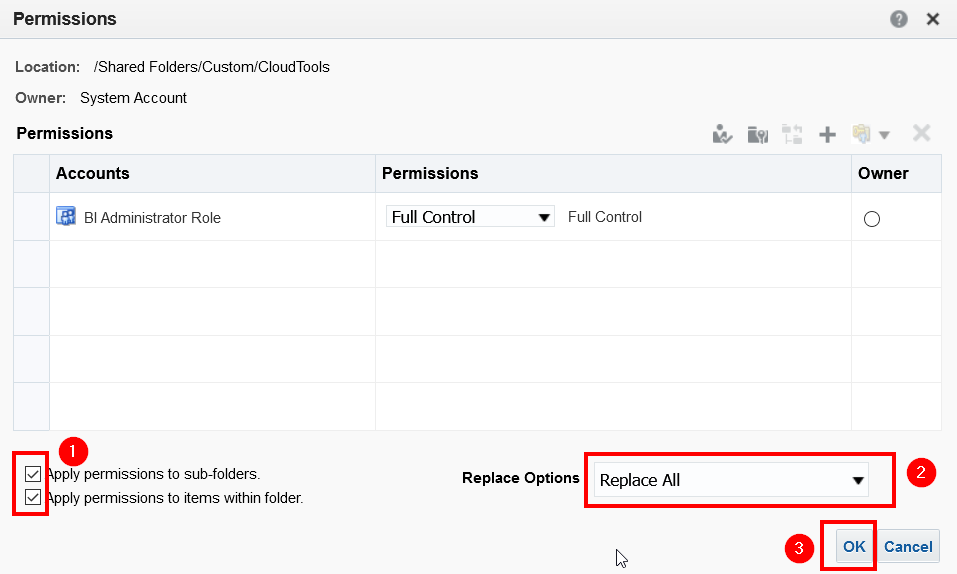
At this time change the permissions so that only BI Administrator (or any IT Developer role) has access to run queries using SQLConnect.

5. Check If You Have Administrative Privileges In BI Publisher

Login to your Oracle Cloud POD BI Publisher
Example URL: https://xxxx-dev1.oracledcloud.com/analytics/saw.dll?catalog
You will see on the right if you have admin rights or not

Hello there
Request A Quote
Ready to Upgrade Your SQL Workflow?
Hello there
Looking for a partner to streamline your data tasks? SQL Connect is here to pull data from multiple Oracle ERP/SCM/HCM Pods. Run ad hoc queries, extract data to CSV or Excel, and make the most of your data. Discover the ease and efficiency of SQL Connect today!
Hello there
Select your version
Hello there
Would you like to view the installation guide?
Hello there
Step 1. Run the downloaded file to install SQL Connect on your computer.

Step 2: Register for Access
If you don’t have a username and password:
  • Click the “SIGN-UP” button on the login screen.
  • Complete the registration form.
  • Check your email for your login credentials.
installation guide
Step 3. First Time Launch
Hello there
Open SQL Connect:
  • For Windows: Go to Start Menu -> Programs -> SQL Connect -> SQL Connect.
  • For Mac: Open Applications and find SQL Connect.
    Logging In:
    • Enter the username and password provided by your administrator or received via email.
    • Note: Trial credentials expire after 15 days.
      Step 4. Creating a New Oracle Connection
      Hello there
      1. Open the Create Connection window in the application.
      2. Enter the following details:
        • Oracle Connection Name: Choose a name for this connection.
        • Oracle Cloud Username: Your user ID for Oracle Cloud.
        • Password: Your Oracle Cloud password. Use the EYE icon to show/hide the password.
        • URL: The web address for your Oracle pod, e.g., 'http://EEEE.us6.oraclecloud.oracle.com'
      3. Click "NEXT" to test and save the connection. If there's an error, check the details or contact your system administrator.
      Step 5. Using SQL connect
      Hello there
      To connect to a database, select “Connect To” and pick your pod from the dropdown list.

      For any issues, refer to the FAQ or contact your administrator. If you are using an enterprise license, please get assistance from your company’s administrator.
      Hello there
      Step 1. Run the downloaded file to install SQL Connect on your computer.

      Step 2: Register for Access
      If you don’t have a username and password:
      • Click the “SIGN-UP” button on the login screen.
      • Complete the registration form.
      • Check your email for your login credentials.
      installation guide
      Step 2. First Time Launch
      Hello there
      Open SQL Connect:
      • For Windows: Go to Start Menu -> Programs -> SQL Connect -> SQL Connect.
      • For Mac: Open Applications and find SQL Connect.
        Logging In:
        • Enter the username and password provided by your administrator or received via email.
        • Note: Trial credentials expire after 15 days.
          Step 3. Creating a New Oracle Connection
          Hello there
          1. Open the Create Connection window in the application.
          2. Enter the following details:
            • Oracle Connection Name: Choose a name for this connection.
            • Oracle Cloud Username: Your user ID for Oracle Cloud.
            • Password: Your Oracle Cloud password. Use the EYE icon to show/hide the password.
            • URL: The web address for your Oracle pod, e.g., 'http://EEEE.us6.oraclecloud.oracle.com'
          3. Click "NEXT" to test and save the connection. If there's an error, check the details or contact your system administrator.
          Step 4. Using SQL connect
          Hello there
          To connect to a database, select “Connect To” and pick your pod from the dropdown list.

          For any issues, refer to the FAQ or contact your administrator. If you are using an enterprise license, please get assistance from your company’s administrator.