Covid-19 Reporting in Oracle HCM Cloud

Here is a list and pre-built reports to help Human Resources with COVID-19 Reporting with Oracle HCM Cloud. Hope this helps.

Oracle realizes that many of HCM Cloud users are busy responding to the current COVID-19 Coronavirus pandemic. Hope that this series of reports will provide relevant content designed to save you time.

Monitor Passport Expiry for Employees

Many organizations are trying to identify which employees have a passport that expires in the coming months. Here is a catalog file of a report that shows a list of those employees.

Steps to Use:

  1. Download the catalog file from this link
  2. Within the BI Catalog, locate the folder where you want to save the content, e.g. Shared Folders>Custom> YourFolder
  3. Unarchive the catalog file and you will see the new report
  4. Link to the original post on Customer Connect https://cloudcustomerconnect.oracle.com/posts/30396bfe04

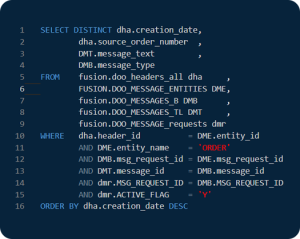
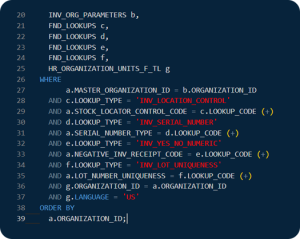
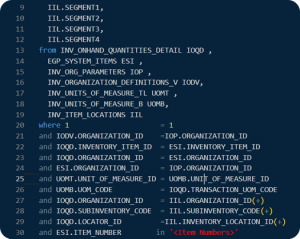
Below is the Query to identify which employees have a passport that expires in the coming months.

SELECT
   0 s_0,
   "Workforce Management - Person Real Time"."Person Passport Details"."Country" s_1,
   "Workforce Management - Person Real Time"."Person Passport Details"."Expiration Date" s_2,
   "Workforce Management - Person Real Time"."Person Passport Details"."Issuing Authority" s_3,
   "Workforce Management - Person Real Time"."Person Passport Details"."Issuing Country" s_4,
   "Workforce Management - Person Real Time"."Worker"."Employee Display Name" s_5,
   "Workforce Management - Person Real Time"."Worker"."Manager Name" s_6,
   "Workforce Management - Person Real Time"."Worker"."Person Number" s_7,
   DESCRIPTOR_IDOF("Workforce Management - Person Real Time"."Person Passport Details"."Country") s_8,
   DESCRIPTOR_IDOF("Workforce Management - Person Real Time"."Person Passport Details"."Issuing Country") s_9,
   TIMESTAMPDIFF(SQL_TSI_MONTH, CURRENT_DATE ,"Workforce Management - Person Real Time"."Person Passport Details"."Expiration Date") s_10,
   COUNT(DISTINCT "Workforce Management - Person Real Time"."Worker"."Person ID") s_11,
   REPORT_AGGREGATE(COUNT(DISTINCT "Workforce Management - Person Real Time"."Worker"."Person ID") BY ) s_12
FROM "Workforce Management - Person Real Time"
WHERE
(("Person Passport Details"."Expiration Date" IS NOT NULL) AND (TIMESTAMPDIFF(SQL_TSI_MONTH, CURRENT_DATE , "Person Passport Details"."Expiration Date") BETWEEN -7 AND 24) AND ("Worker"."Assignment Status Type Code" = 'ACTIVE'))
ORDER BY 1
FETCH FIRST 75001 ROWS ONLY

Query has been tested on Fusion 20A but applicable to earlier versions as well.

Hello there
Request A Quote
Ready to Upgrade Your SQL Workflow?
Hello there
Looking for a partner to streamline your data tasks? SQL Connect is here to pull data from multiple Oracle ERP/SCM/HCM Pods. Run ad hoc queries, extract data to CSV or Excel, and make the most of your data. Discover the ease and efficiency of SQL Connect today!
Hello there
Select your version
Hello there
Would you like to view the installation guide?
Hello there
Step 1. Run the downloaded file to install SQL Connect on your computer.

Step 2: Register for Access
If you don’t have a username and password:
  • Click the “SIGN-UP” button on the login screen.
  • Complete the registration form.
  • Check your email for your login credentials.
installation guide
Step 3. First Time Launch
Hello there
Open SQL Connect:
  • For Windows: Go to Start Menu -> Programs -> SQL Connect -> SQL Connect.
  • For Mac: Open Applications and find SQL Connect.
    Logging In:
    • Enter the username and password provided by your administrator or received via email.
    • Note: Trial credentials expire after 15 days.
      Step 4. Creating a New Oracle Connection
      Hello there
      1. Open the Create Connection window in the application.
      2. Enter the following details:
        • Oracle Connection Name: Choose a name for this connection.
        • Oracle Cloud Username: Your user ID for Oracle Cloud.
        • Password: Your Oracle Cloud password. Use the EYE icon to show/hide the password.
        • URL: The web address for your Oracle pod, e.g., 'http://EEEE.us6.oraclecloud.oracle.com'
      3. Click "NEXT" to test and save the connection. If there's an error, check the details or contact your system administrator.
      Step 5. Using SQL connect
      Hello there
      To connect to a database, select “Connect To” and pick your pod from the dropdown list.

      For any issues, refer to the FAQ or contact your administrator. If you are using an enterprise license, please get assistance from your company’s administrator.
      Hello there
      Step 1. Run the downloaded file to install SQL Connect on your computer.

      Step 2: Register for Access
      If you don’t have a username and password:
      • Click the “SIGN-UP” button on the login screen.
      • Complete the registration form.
      • Check your email for your login credentials.
      installation guide
      Step 2. First Time Launch
      Hello there
      Open SQL Connect:
      • For Windows: Go to Start Menu -> Programs -> SQL Connect -> SQL Connect.
      • For Mac: Open Applications and find SQL Connect.
        Logging In:
        • Enter the username and password provided by your administrator or received via email.
        • Note: Trial credentials expire after 15 days.
          Step 3. Creating a New Oracle Connection
          Hello there
          1. Open the Create Connection window in the application.
          2. Enter the following details:
            • Oracle Connection Name: Choose a name for this connection.
            • Oracle Cloud Username: Your user ID for Oracle Cloud.
            • Password: Your Oracle Cloud password. Use the EYE icon to show/hide the password.
            • URL: The web address for your Oracle pod, e.g., 'http://EEEE.us6.oraclecloud.oracle.com'
          3. Click "NEXT" to test and save the connection. If there's an error, check the details or contact your system administrator.
          Step 4. Using SQL connect
          Hello there
          To connect to a database, select “Connect To” and pick your pod from the dropdown list.

          For any issues, refer to the FAQ or contact your administrator. If you are using an enterprise license, please get assistance from your company’s administrator.